Showing posts with label hints and tips. Show all posts

Friday, 29 April 2016

On Headaches


Headaches have pretty much plagued me all my life; in my second year of university I would get them every single day without fail. (And no it is not to do with my eyesight and requiring glasses). What causes them, I'm not sure, but from time to time they can be a lot worse than others. 
Headaches can be a common problem among many people, and everyone has their own ways of trying to combat these. So today here are my few tips (aside from the really obvious ones) that I have found can really help to ease, and try to reduce the onslaught of them!

I drink a lot of tea. And coffee. Both of which include caffeine and which is a big cause of headaches. So I have been trying really hard to cut down my caffeine intake. The main way that I have been doing this (cut out tea altogether I hear you say; god no!), is to swap one of my standard cup of teas for a Green tea. Not only is this far less caffeine but Green tea is known for its numerous health benefits. I'm currently loving the PG Tips one; it says smooth on the box and although I don't quite know what that means, it is smooth!

In a related note; dehydration is another leading cause of headaches (something that one of my friends always used to tell me back in school was the cause of my headaches). Along with reducing caffeine intake (a big dehydrater!) I am trying to drink waaayy more water. And when I say waaayy, I mean I never used to really drink anything in the day aside from tea. I have started running which has helped the water intake. I recommend having some sort of funky water bottle to motivate the water drinking.

Another good favourite of my is a head balm. I have one from Badger that comes in stick form so you can just spread it across your forehead. Anything like this I find definitely helps to soothe an achey head!

Continuing on that theme; anything cold. Placing wet flannels (or even wet tissues in a restaurant during a particular bad migraine) always and I mean always helps. I always find myself putting anything cold across my forehead; my hands, my ipod, my water bottle. 

Naps. I personally am quite a big napper anyway, and whenever I feel a bit worse for wear I generally resort to a nap. (Shout out to Hannah, another napper!) If you're really not sure what else to do and are getting nowhere with your day, definitely try and take a nap. Even just shutting your eyes for a little bit can work wonders. 

During my last speight of headaches I ended up researching if they are in fact linked up to hormones and periods. And guess what? Hormone headaches are a thing; most likely to hit around the third day of your period! So definitely keep that in mind if you are prone to headaches. Read up on that here.

And one more that the boyf has just suggested; headache candles. I personally had never heard of, let alone tried these, but after looking into them they sound quite nice! Made from soy and aromatherapy based they sound quite soothing.

I hope this has helped if you are a headache sufferer and let me know if you have any of your own tips that work wonders on an achey head!

xoxo

Thursday, 29 January 2015

Highlighting Like A Pro(Artist)


The above image is a self protrait by the artist Albert Durer in 1500. The level of detail which he has shown here is astonishing, but what Durer was really good at, and what he really knew how to do, was to use light. To show where the ligth source would hit the skin, and how this would highlight the face.
Within make up, we use highlighter to naturally show the 'high' points of the face; to accentuate those areas which the light would in order give ourselves more a glow in a natural kind of way. And that's exactly what painters want to do. Were an artist to paint a face without any highlight, not only would it be extremely dull, but it would also be rather unrealistic.

Now I'm not saying you need to highlight the exact areas that Durur has...applying highlighter to your fingers might not be the best option, but if you're unsure where exactly to highlight, then this is one way to think about it.


An image I used for an article in Moda, this is one of the classic tips for highlighting, and I am by no means sharing it as my own. But make sure to highlight in a triangle shape under your eyes to really highlight (that doesn't even sound like a word anymore) that area.
Down the nose, the browbone, the cheekbone, the cupid's bow and the inner corner of the eye are all the best places to highlight.
If you are still unsure whether or not to highlight an area, just think if you were painting your face, like an artist: what areas would you want to look a little more glowing?

If Durer knew how to highlight in 1500, then you can definitely know how to in 2015!

Are you a highlighting pro like Durer?
xoxo

Monday, 12 May 2014

Beauty Expirary Dates

I'm pretty sure that in this day and age, nearly every single thing even slightly perishable thing has an expirary date, and beauty and cosmetic products are no exception!
It wasn't until very recently that I actually found out what the expirary symbol on beauty products was, and ever since then, I have been acutely aware of how long everything lasts. The symbol itself is the little pot with the lid off on the back of products; the number under the lid is the amount of months that something is meant or at least designed  to last. Now I am by no means saying that 6 months from the date you bought the product, it's gotta go. Most people who own any sort of make up will probably keep it until it either runs out, or it has been so long that it has, gone off. What I'm suggesting more is that these should be used as a guide as to how maybe how long you should use a product for.
And of course, if you have sensistive skin, or problematic skin, maybe keep a keener eye out on how long you've had products for. Wetter products such as foundations, concealers etc are more likely to not last past the expirary simply because of what they are, liquids. More powder based products, such as eyeshadows, tend to last longer but let's face it, if you use up an ENTIRE eyeshadow in 6 months, you're probably using it wrong. Mascaras generally tend to dry up sooner than the date and it's quite obvious when the dry, clumpy wand needs binning.
A lot of people are however unaware of the dates, and so I hope that this has been a little insight into the more 'sciencey' side of make up!

I apologise ever so much for the out of focus mascara...flash + super macro = dying camera

The average length of time seems to be:
  • Lip balm - 12 months
  • Mascara - 6 months
  • Eyeshadow - Anything from 3 - 24 months
  • Lip gloss - 3-6 months
  • Lip stick - Probably thr longest lasting at up to 30 months
  • Foundation (and similar products) - 18 months
  • Moisturisers (and similar products) - 12 months
  • Cleansing Waters (and similar products) - 6 months
I hope that you found this helpful and as strangely interesting as me!
xoxo

Disclaimer: I am not a make up artist or anything similar at all, I merely have an avid interest in make up and have done various research into this. I am by no means stating all of this as true and exact, merely what I have found. 

Monday, 10 February 2014

The Kite Runner - Khaled Hosseini | Book Review


So this is one of those books; you know the ones I mean. Everyone's read it, everyone loves it, everyone thinks it's amazing. Now don't get me wrong, I'm glad I've read it, but to be perfectly honest, this was one of the saddest books I have ever read (and the Noughts and Crosses series put me off reading, thank you very much Malorie Blackman). It just seemed that nothing good at all ever happened; at every turn everything that could have possibly gone wrong, did go wrong. Or as soon as something vaguely positive did happen, it would be drastically brought down by  devastation of some sort or another.
It follows a man called Amir sharing his life story, starting back when he was a child growing up in Afghanistan with a Hazara boy called Hassan. The relationship between these two is something which a part of me longs for; as a friend said of Hassan: 'He is such a beautiful person'. Various events unfold resulting in Amir and Hassan being separated. Amir ends up moving to America with his beloved, Baba, who throughout the entire book he strives to earn the respect and love from him which he believes he lacks.

The book was very well written, and at times I really did find myself captivated by the story, however a book such as this would normally take me days to get through. This took me around a month simply because I struggled so much to keep picking it up as it was depressing me so much. I would definitely recommend this book to those who absolutely adore reading, but word of warning: it is not for the faint-hearted.  

(Note: I apologise for the lack of proper photo; the problems of travelling back home for reading week...)

Next Up: The Wolf of Wall Street - Jordan Belfort

What are your thoughts?
xoxo

Wednesday, 29 January 2014

Mother Proof Beauty Rules (They Never Fail!)


My Mother is full of some very unique wisdom and although her love of make up and all things beauty does not quite reflect mine, she has taught me many very important things over the years. Not to mention have I always had certain things ingrained into me by general life.
So I thought that I would share these and maybe spread the wisdom!

  1. The Killer: always remove your make up before bed. (Sorry guys, but you know it's true...)
  2. Try not to touch your face; what's on your fingers will go onto your face! (Wipes off jam smears...)
  3. Plucking brows after a bath or shower is most definitely easier. 
  4. Only put your conditioner on your ends (smother it on them if you will); otherwise your roots will become very greasy! You may in fact not need conditioner if your hair is naturally very soft. 
  5. Applying body moisturisers/lotions is best when you skin is still damp. (Check your righteous butters if you don't believe me!)
  6. A bit of cold(er) water can make your hair that much shinier. 
  7. Use your face moisturiser on your neck too!
  8. Old toothbrushes can be great for exfoliating lips. 
  9. Always file your nails and never cut them; file in one direction, the same way every time. 
  10. Never tug hair bands out of your hair, unwrap them. 
  11. Always start brushing your hair at the ends. 
  12. Do not stretch the skin around your eyes when applying or removing make up; this equals wrinkles!
  13. Use your ring fingers (are they both ring fingers?) to apply product(s) to your face as it is the most delicate/gentle and will damage your skin less. 
  14. Face creams and body creams are not the same. 
  15. It's nice to let your skin breathe a little some days; it's okay to leave the make up!

I hope  that you've found these useful and maybe your mother's have told you these as well!

What are your fail-proof beauty rules?
xoxo

Friday, 10 January 2014

Seventeen Lip Crayon Kit | Sales Goodies


As Christmas takes over at Boots in the form of 3 for 2 gift sets, I peruse these aisles to spot things which I will then hope to God that they will still be there in the sales afterwards. This year, or in fact, last year now(!), I spotted this little set and thought: you my friends, will be mine in the half price sales.

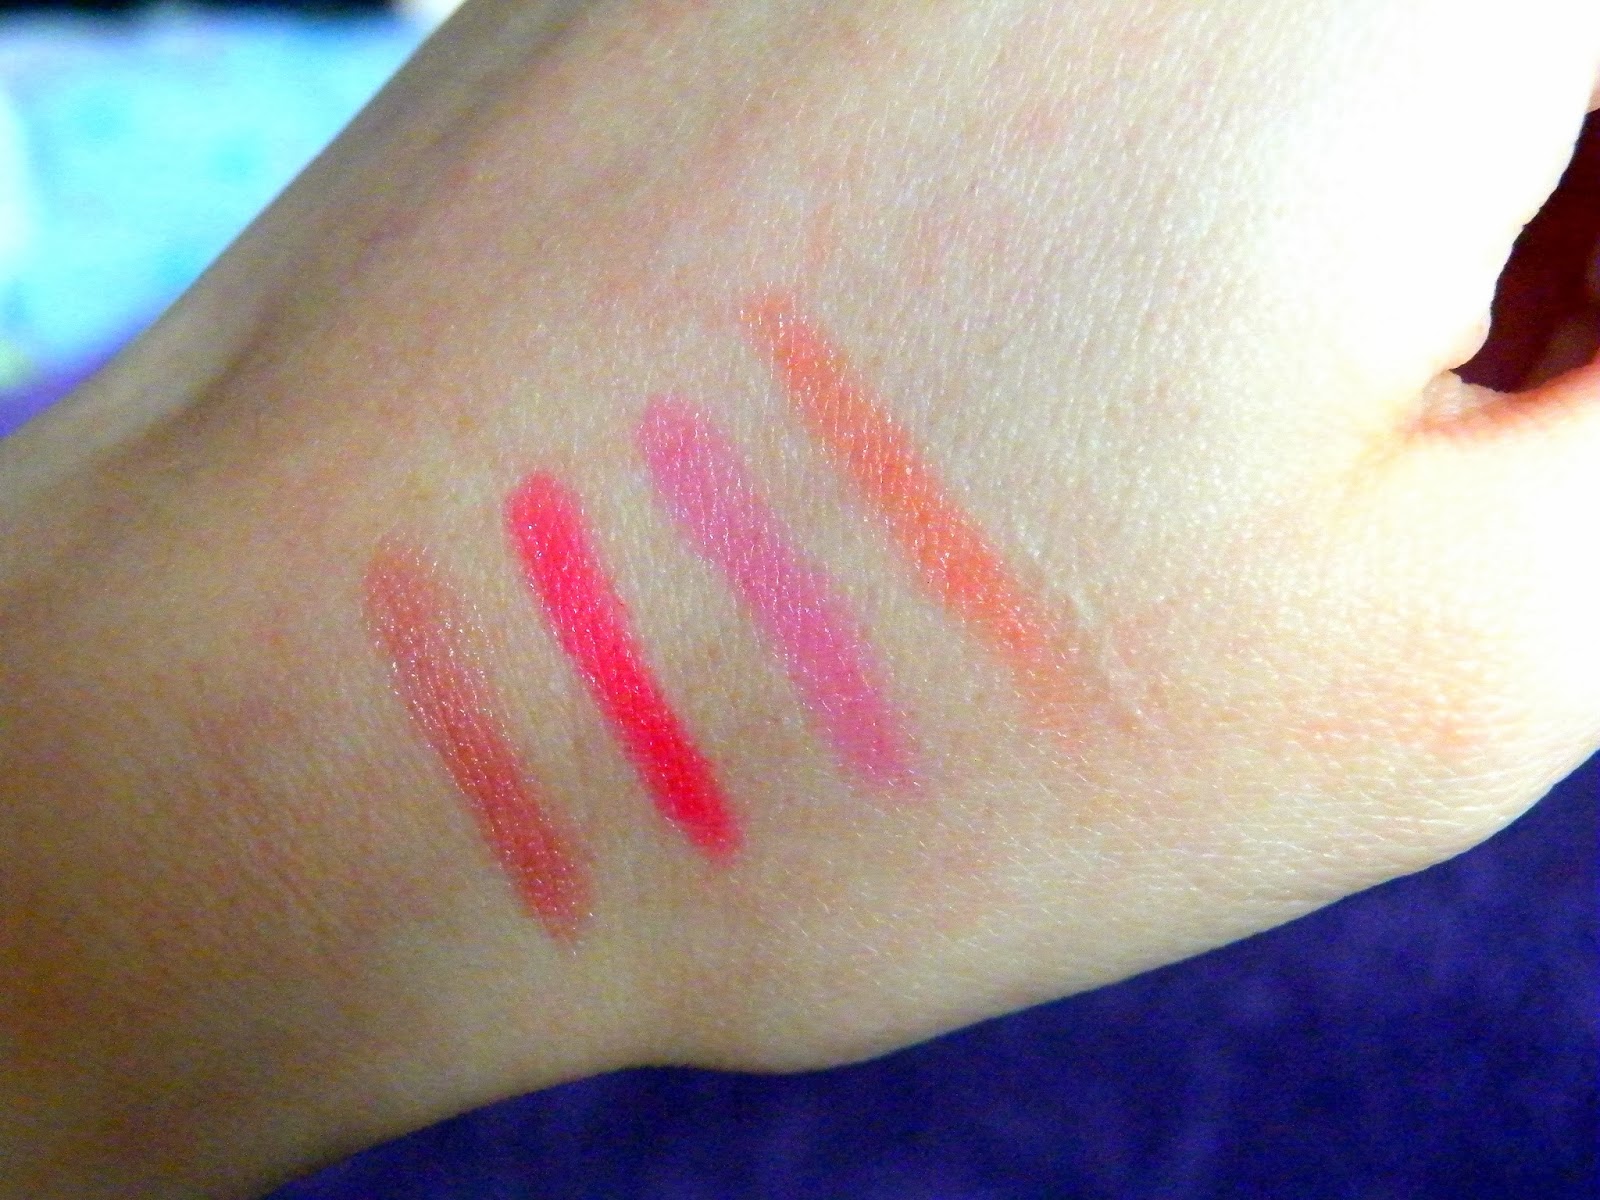
The lip crayon sensation completely took over last year with all brands jumping on the Clinique Chubby Stick band wagon (which are a particular favourite of mine). Revlon had their Just Bitten Kissable Balm Stains, Bourjois Color Boost, L'OReal the list goes on. As I really enjoy these kinds of products I thought that four of these for a fiver (half price from £10 originally) were a complete steal!

I was sceptical about the more nude-y pink, but really loved the look of the red and the orange; as we all know these are my favourite colours for lips. However I have really enjoyed wearing the nude! Seventeen may have converted me...

From left to right, Nude, Red, Pink and Orange

I really like these; they glide on nicely, they feel nice on your lips and the colours are pigmented. They have nice glossy effect and although do seem slightly washed out than the packaging colour, for such a bargain I can't complain! I don't really have any downsides, just me being slight pedantic over certain aspects in that I really wish they had names! As opposed to just 'that pinky one', however I can't complain! The 'Hints and Tips' are also slightly having delusions of grandeur but here they are:

'How To create the Perfect Lips

1. Use a sharpened lip crayon to contour your lips, following their natural outline.
2. Colour in the whole lip, blending the colour evenly.
for more pout appeal, add a dab of clear gloss to the centre of your top and bottom lips, it cleverly reflects the light to create the optical illusion of fuller lips!'


I hope that you also got your hands on a pack of these babies; they were definitely a good find!

What sales goodies did you find?
xoxo

Sunday, 5 January 2014

Box Swap | 2013

That's right, my friend Emily and I went a did a box swap. And it was such a good idea! We both really loved what we got the other and so of course, as it was beauty related, I needed to blog about it. It is also a really good idea for birthdays or even Christmas (that's right, get organised for this year!)

Emily's Box:

For Emily I chose some products that I really love and wanted her to also love! I went with the MUA Undress Me palette, an Essie Mint Candy Apple dupe which was by Sinful Colours, the Collection Lasting Perfection Concealer, Burt's Bees Mango Lip Balm and some of her favourite sweets: Percy Pigs.


I re-used a Glossy Box for Emily's box.
Sorry for the poor lighting here as well!

My Box:

Emily got me some lovely things; I was really pleased! Mine included some thermal socks, a lovely purple throw (so cosy!), a Barry M lipstick in 151; a beautiful red coral shade, a Glitter nail varnish, some earrings from River Island and the AMAZING L'Oreal Skin Perfection Water Cleanser. 


I hope this gives you some ideas for a box swap!
xoxo


Thursday, 2 January 2014

Cleaning Make Up Brushes || How To 1

It's a new year which means a fresh start and quite often, a spring clean. My spring cleaning has begun (and most probably ended) with the cleaning of my make up brushes. I know that this post is quite a common one, but I didn't think a blog posting about beauty could really get away without doing one.
So here is my little take on making those stained brushes clean again; or at least cleaner!

  1. I ran a sink full of some warm water, whilst just rinsing off some of the less in-built mess from the brushes.
  2. Squirt some baby shampoo into your water. 
  3. Soak brushes in the water for only a little bit before then really trying to brush the first out of them.
  4. I then got some kitchen towel and placing it in the palm of my hand, swirled the brushes around on it to remove the make up. Really scrubbing the bristles with your fingers helped to get some of that make up out which really did not want to move.
  5. Leave to dry!
Before


After

 Obviously, the more often you clean your brushes, the less work you have to do with them! It seems that everyone has put 'Cleaning make up brushes more regularly' on their new years resolutions; perhaps I should too!
Have you put this on your resolutions?
xoxo

Tuesday, 31 December 2013

Party Season Make Up

As my lovelylovely friend Lucy said, we all need to know how to nail that perfect party look 'without looking like a drag queen'. As it is the Festive Season, it is also the time for all that sparkles, glitters and twinkles. This can only mean one thing: shimmer eye shadows and lip gloss.


  1. First thing's first. The Face. Think of your face as a blank canvas; making that first mark is always the hardest and so you need to prep the surface first. One of my absolute favourite products is concealer; seriously, the right one works wonders. I have been loving Collection 2000 Lasting Perfection Concealer. I use it in the colour '2 Light". I personally blend this into my skin using a Real Techniques Foundation Brush (I know, I know, the wrong brush but it's so good!), or even sometimes I just use my fingers. I apply this under my eyes, around my nose and wherever else I might have blemishes or any redness.
  2. From here, foundation. As it is a party look, I think that a foundation which has illuminating features makes your face have that little extra glow and means that you are left looking even more radiant. The Rimmel Wake Me Up foundation is perfect for this; it has a slight shimmer with it, which not only wakes up but does also give your skin a lovely complexion.
  3. At this point I would move on to eyes. If you have an eye shadow primer/base, now is the time to use it! If not, don't worry just take a bit of extra care when applying. If you're going for a sparkly finished look, I would use a matte shade as a base; this will enhance the shimmer and help the top layer blend better. I am currently really loving he MUA Undress Me palette; it is very similar to the Undress Me Too Palette which is a Naked palette dupe, however  I feel that the Undress Me palette could quite easily be a dupe as well! For all eye shadow needs I absolutely adore the MAC 217 brush, (it has served me better than any man ever could!) Blend your shimmer eye shadow from the inner corner of your eye to your brow bone, blending into the crease of your eye. 
  4. Over the top of this I would then advise, not even suggest, advise, you to apply a little of MAC's Vanilla Pigment into the inner corner; this really opens up your eyes. Also apply this to your brow bone; it works as a wonderful highlighter. At this point fill in your brows however you wish!
  5. Now Mascara. I have absolutely been. loving Avon's Mega Effects mascara so will be applying lashings of that. don't forget to curl them beforehand! This means your lashes will look even fuller and longer once mascara is then applied. 
  6. As it is Winter, I also like to give my cheeks a bit of sparkle with a slightly shimmery blusher. I go for reds/pinks during this time as it gives you a nice natural outside glow. I would use either a Sleek blush or Avon Face Pearls. 
  7. During this process I would have applied some lip balm of some sort (the amount of lip balms I own is beyond ridiculous; didn't stop me buying two more today though...). This just means that your lips are really ready for lipstick/gloss. I would go for some form of red; I'm really liking Sleek's Rioja Red Matte Me Lip Gloss; it is a very vibrant red. If red isn't for you, maybe try a shimmer gloss such as Soap & Glory's Sexy Mother Pucker. Whack one of these on and you're ready to go!